The HC-SR04 ultrasonic sensor is one of the most popular sensors for distance measurement in Arduino projects. It's cheap, accurate (up to 4 meters), and incredibly easy to use. In this tutorial, you'll learn how to build a complete distance measuring device.
What You'll Need
- Arduino UNO or Nano
- HC-SR04 Ultrasonic Sensor
- 16x2 LCD Display (optional)
- Piezo Buzzer (optional for parking sensor)
- Breadboard and Jumper Wires
- 9V Battery or USB Power
How HC-SR04 Works
The HC-SR04 sensor uses ultrasonic sound waves to measure distance. It sends out a high-frequency sound pulse (40kHz) and measures the time it takes for the echo to return. Using the speed of sound (343 m/s), we can calculate the distance.
Formula
Distance (cm) = (Time × Speed of Sound) / 2
Distance (cm) = (Duration in microseconds × 0.0343) / 2
Wiring Connections
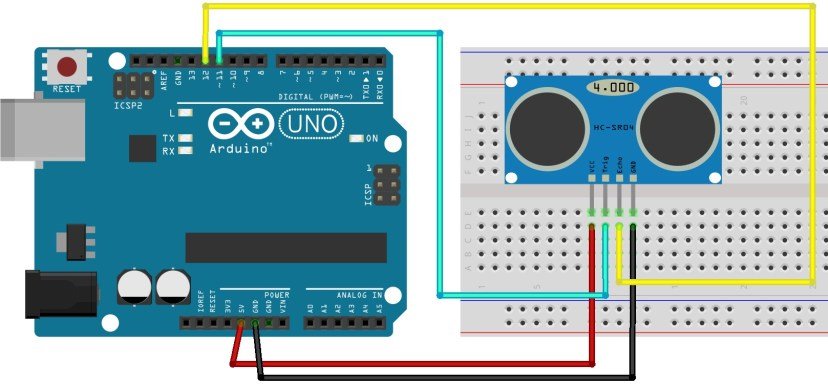
Connect the HC-SR04 sensor to Arduino as follows:
- VCC → Arduino 5V
- GND → Arduino GND
- TRIG → Arduino Pin 11
- ECHO → Arduino Pin 12
Basic Arduino Code
#define TRIG_PIN 11
#define ECHO_PIN 12

void setup() {
  Serial.begin(9600);
  pinMode(TRIG_PIN, OUTPUT);
  pinMode(ECHO_PIN, INPUT);
}

void loop() {
  // Clear trigger pin
  digitalWrite(TRIG_PIN, LOW);
  delayMicroseconds(2);

  // Send 10us pulse
  digitalWrite(TRIG_PIN, HIGH);
  delayMicroseconds(10);
  digitalWrite(TRIG_PIN, LOW);

  // Read echo pulse
  long duration = pulseIn(ECHO_PIN, HIGH);

  // Calculate distance in cm
  float distance = (duration * 0.0343) / 2;

  Serial.print("Distance: ");
  Serial.print(distance);
  Serial.println(" cm");

  delay(500);
}
Adding LCD Display
To show the distance on an LCD, add the LiquidCrystal library:
#include <LiquidCrystal.h>

#define TRIG_PIN 11
#define ECHO_PIN 12

LiquidCrystal lcd(12, 11, 5, 4, 3, 2);

void setup() {
  lcd.begin(16, 2);
  pinMode(TRIG_PIN, OUTPUT);
  pinMode(ECHO_PIN, INPUT);
  lcd.print("Distance Meter");
  delay(2000);
  lcd.clear();
}

void loop() {
  digitalWrite(TRIG_PIN, LOW);
  delayMicroseconds(2);
  digitalWrite(TRIG_PIN, HIGH);
  delayMicroseconds(10);
  digitalWrite(TRIG_PIN, LOW);

  long duration = pulseIn(ECHO_PIN, HIGH);
  float distance = (duration * 0.0343) / 2;

  lcd.setCursor(0, 0);
  lcd.print("Distance:       ");
  lcd.setCursor(0, 1);
  lcd.print(distance);
  lcd.print(" cm    ");

  delay(300);
}
Building a Parking Sensor
Add a buzzer to create a parking assistant that beeps faster as objects get closer:
#define BUZZER_PIN 8

void loop() {
  // ... (distance measurement code)

  if (distance < 10) {
    tone(BUZZER_PIN, 1000);
    delay(100);
    noTone(BUZZER_PIN);
    delay(100);
  } else if (distance < 30) {
    tone(BUZZER_PIN, 800);
    delay(200);
    noTone(BUZZER_PIN);
    delay(300);
  } else if (distance < 50) {
    tone(BUZZER_PIN, 600);
    delay(500);
    noTone(BUZZER_PIN);
    delay(500);
  } else {
    noTone(BUZZER_PIN);
  }
}
Improving Accuracy
For better results, implement these tips:
- Take multiple readings and calculate the average
- Filter out impossible values (less than 2cm or more than 400cm)
- Use median filtering to eliminate noise
- Keep the sensor away from vibrations
- Avoid measuring at extreme angles
Average Reading Code
float getDistance() {
  float sum = 0;
  for(int i = 0; i < 5; i++) {
    digitalWrite(TRIG_PIN, LOW);
    delayMicroseconds(2);
    digitalWrite(TRIG_PIN, HIGH);
    delayMicroseconds(10);
    digitalWrite(TRIG_PIN, LOW);

    long duration = pulseIn(ECHO_PIN, HIGH);
    float distance = (duration * 0.0343) / 2;
    sum += distance;
    delay(50);
  }
  return sum / 5;
}
Project Ideas
- Robot obstacle avoidance - Mount on servo for scanning
- Water level indicator - Measure tank levels
- Automatic door opener - Detect presence
- Height measurement tool - Portable measuring device
- Security alarm - Perimeter detection system
Troubleshooting
Sensor Returns 0 or Strange Values
- Check wiring connections
- Ensure 5V power supply is stable
- Verify pins are set correctly in code
Inconsistent Readings
- Target surface should be flat and hard
- Avoid foam, cloth, or soft materials
- Keep sensor perpendicular to target
Conclusion
The HC-SR04 ultrasonic sensor is perfect for beginners learning Arduino. It's reliable, inexpensive, and opens doors to countless robotics and automation projects. Start with the basic distance meter, then expand to parking sensors, robots, or smart home applications!
What will you build with your ultrasonic sensor? Share your projects in the comments! 🤖
 Arduino UNO Rev3